Analysing Malicious Email Files

As an Incident Responder it’s pretty common to analyse malicious emails, however finding the right tools, to safely pull apart an email, isn’t always easy to find. I often find analysts struggle to pull apart an email once you explain the risks of using Microsoft Outlook as an analysis tool. This post will look at using open source tools within the SANS SIFT Workstation virtual machine to safely pull apart a native outlook email message.
To start with, a native Outlook email message is in an .MSG file format. This format, unfortunately, can’t be opened and viewed easily with a text editor, which is where we want to end up. Using a simple text/ASCII viewer has far fewer risks of executing anything malicious, which is why we want to avoid using Microsoft Outlook to open our suspicious emails.
Historical, Microsoft Outlook has had vulnerabilities that allow for exploitation of a system from simply viewing an email in Microsoft Outlook. It’s because of this risk, malicious code being executed, that we Incident Responders want to avoid using Outlook as a forensic analysis tool.
For this example, I’m going to assume you have a running Ubuntu virtual machine, or ideally the SANS SIFT Workstation running. If you don’t, take a look at this site for some details on using the SIFT Workstation.
Converting a Malicious .MSG File to ASCII
Once inside your Ubuntu virtual machine pop open a terminal prompt and install the Lib Email package that allows us to convert a .MSG file into an .EML file by typing the following commands.
$ sudo apt install libemail-outlook-message-perl libemail-sender-perlGetting our suspicious email into an .EML format will at least get the file into something readable via a text/ASCII viewer. Once we have our Lib Email package installed we can use msgconvert to decode our .EML file. Below is an example of how to use this tool.
$ msgconvert my_email_file.msgOnce we’ve executed this command we’ll get a duplicate version of our .MSG file, with the same name, except in an .EML file format. Following the above command if we do a simple ls we should see the new .EML file.
$ ls
my_email_file.eml
my_email_file.msg
As it stands now, we can open the .EML file in standard ASCII/text viewer and start to read the header, body and view any encoded attachments. From this point forward I’m going to use the malicious .MSG example (SHA1: 76711be7cdc85a00c4a34ad34d62715f238da23ef06de7f62570329655c137b9) that I’ve referenced at the end of this article.
Analysing a Malicious .EML File
Finally, we’re at the point of viewing our malicious email message in an ASCII/text viewer, to start off let’s open the converted .EML file in your prefered ASCII/text viewer. For this example I’m going to use vim, however, any command line or GUI based text viewer will do.
$ vi my_email_file.emlLooking at our .EML file you’ll notice that it’s broken up into a few different sections.
Header
The header is not normally visible to an end-user, however, as Incident Responder it contains some beneficial information, most notably the meta-data of the email and the path the email took before it arrived with our victim. Below is a screenshot of part of the meta-data, along with a breakdown of useful meta-data from this malicious sample.

Here is some simple meta-data about the email that should be fairly obvious necessary for documenting in any case records.
Subject: Submission 5DW8 F36N MG2A 9HJ not processed
From: "noreply.taxreg@notifications.hmrc.gov.uk" <noreply.taxreg@notification-hmrc-gov.uk>
To: derek@oneknight.co.uk
We also have the below line which shows us where the email originated from (191.101.26.121). This will always differ for every email you analyse as it entirely depends on your email infrastructure and how the email got to the victim. The best way to identify this is to look for the lowest line in the .EML file with the Received field and an IP or FQDN.
Received: from [191.101.26.121] (port=38777 helo=notification-hmrc-gov.uk) by knight.knighthosting.co.uk with esmtp (Exim 4.91) (envelope-from <noreply.taxreg-derek=oneknight.co.uk@notification-hmrc-gov.uk>) id 1fpv8V-0001uf-0x for derek@oneknight.co.uk; Wed, 15 Aug 2018 13:42:56 +0100We can determine when the email left the originating email sender by reviewing the below line. This will also differ as mentioned above, however, try and find the lowest line in the .EML file with a “Received” field and timestamp. When we convert this back to UTC we can determine the email was sent on the 15th of August 2018 at 12:38:21 UTC. The other useful item here is the timezone stamp, this is the timezone that the sending MTA gateway was set to, in this case, it was -4 UTC or commonly known as EST. While I wouldn’t consider this an ironclad attribution indicator, it’s certainly an interesting indicator.
Received: by notification-hmrc-gov.uk id hegfpmmdegsm for <derek@oneknight.co.uk>; Wed, 15 Aug 2018 08:38:21 -0400 (envelope-from <noreply.taxreg-derek=oneknight.co.uk@notification-hmrc-gov.uk>)There are also many other interesting fields, in this sample, we can see a number of “X-Knighthosting…” fields, these are actually an “X-” field that allows third-party products to add private fields into an email header. Most commonly they are used by third-party SMTP gateways that perform AV or SPAM scanning.
Body
This is the main section of the email or at least the main section our victim sees. It’s important as it’s usually part of the lure used to encourage our victim to perform an action.
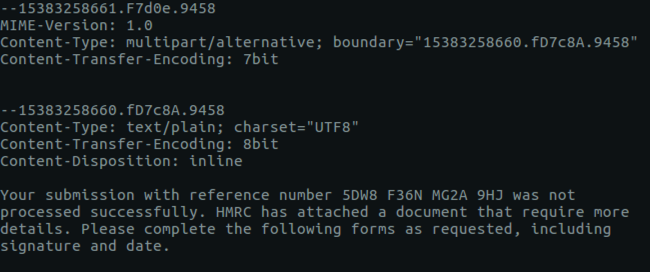
One import line in this section is our boundary statement shown below. This line, directly after the Header section, tells our email client that the email is made up of multiple parts which have “15383258660.fD7c8A.9458” at the top boundary for each part that needs to be rendered when the email is displayed.
Now that we know this email is a multi-part email and what the boundary headers are, we can determine that the first part of the email body, shown below, is plain text with the “text/plain” reference and uses a character set of “UTF8”.
--15383258660.fD7c8A.9458
Content-Type: text/plain; charset="UTF8"
Content-Transfer-Encoding: 8bit
Content-Disposition: inline
Because this is a simple UTF8 character set, which our ASCII/text reader easily interprets, we can see the email body content which I’ve extracted below.
Your submission with reference number 5DW8 F36N MG2A 9HJ was not processed successfully. HMRC has attached a document that require more details. Please complete the following forms as requested, including signature and date.Attachment(s)
By far the most interesting section for Incident Responders, this contains all the attachments within the email. In this sample, we have two attachments, one that’s an RTF and another that’s a DOC file. These are pretty easy to determine within our ASCII/text version of the EML file.
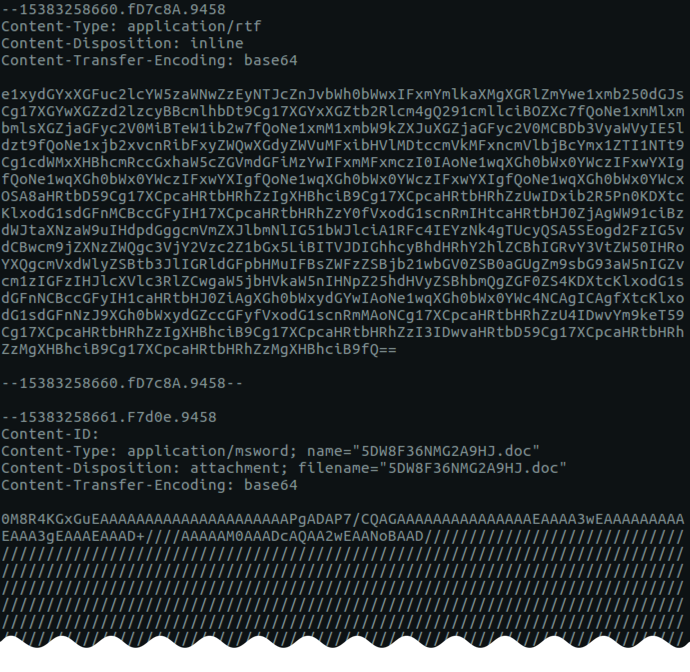
Below is the start of our RTF file attachment which shows us that the attachment is encoded with base64. This is important for our last step in extracting and converting the attachments back to their original form. You will see a blank line followed by a large blob of base64 encoded data, this blob of data is actually the RTF file.
--15383258660.fD7c8A.9458
Content-Type: application/rtf
Content-Disposition: inline
Content-Transfer-Encoding: base64
Below is the start of our DOC file attachment which also shows us that the file attachment is called “5DW8F36NMG2A9HJ.doc”. Again, this attachment is indicated as base64 encoded and is succeeded with a large blob of base64 encoded data, this blob of data is our DOC file.
--15383258661.F7d0e.9458
Content-ID:
Content-Type: application/msword; name="5DW8F36NMG2A9HJ.doc"
Content-Disposition: attachment; filename="5DW8F36NMG2A9HJ.doc"
Content-Transfer-Encoding: base64
Decoding an .EML Attachment
Now that we know our malicious sample from above has two attachments, it’s time to extract these attachments so we can see if they are malicious, spoiler alert — one of them is malicious, so please do this next section in an isolated virtual machine.
As mentioned above the attachments are base64 encoded, so we need to extract the base64 sections so we can decode them back into their original format. For the next part, I’m going to assume you want to keep all processing, as I’ve done so far in this post, in a single Ubuntu (in this case the SANS SIFT Workstation) virtual machine. However, do note there are quick web pages that will decode base64 much quicker, although for OPSEC (Operational Security) reasons you may not want to take your malicious evidence processing outside of your own environment. I certainly would recommend you keep everything isolated locally.
To start with, I’ve merely copied out the base64 encoded sections and pasted them into two separate files.
$ ls
attachment-1-RTF
attachment-2-doc
When doing this I’ve ensured there is no leading or trailing spaces around the base64 data, I’ve also not included the meta-data section information I discussed above. As an example, here is what the start of the RTF base64 section looks like, and what the end the RTF base64 section looks like.
$ head -n 3 attachment-1-RTF
e1xydGYxXGFuc2lcYW5zaWNwZzEyNTJcZnJvbWh0bWwxIFxmYmlkaXMgXGRlZmYwe1xmb250dGJs
Cg17XGYwXGZzd2lzcyBBcmlhbDt9Cg17XGYxXGZtb2Rlcm4gQ291cmllciBOZXc7fQoNe1xmMlxm
bmlsXGZjaGFyc2V0MiBTeW1ib2w7fQoNe1xmM1xmbW9kZXJuXGZjaGFyc2V0MCBDb3VyaWVyIE5l

$ tail -n 3 attachment-1-RTF
dG1sdGFnNzJ9XGh0bWxydGZccGFyfVxodG1scnRmMAoNCg17XCpcaHRtbHRhZzU4IDwvYm9keT59
Cg17XCpcaHRtbHRhZzIgXHBhciB9Cg17XCpcaHRtbHRhZzI3IDwvaHRtbD59Cg17XCpcaHRtbHRh
ZzMgXHBhciB9Cg17XCpcaHRtbHRhZzMgXHBhciB9fQ==
Once we have the extracted base64 attachments in separate files on their own, we can now decode them back to their original format. This process is pretty simple and just uses the built-in Ubuntu application base64. Using this application we’re going to decode our input file, by using the “-d” flag, ignore any invalid base64 characters by using the “-i” flag, then output the decoded information into a new file we’re calling “attachment-1.RTF” and “attachment-1.DOC” respectfully.
$ base64 -d -i attachment-1-RTF > attachment-1.RTF
$ base64 -d -i attachment-2-DOC > attachment-1.DOC
At this point, you now have both attachments in their original form so you can either statically analyse them, put them into a sandbox and do dynamic analysis, or check them out on VirusTotal. If you take a look at the DOC file on VirusTotal you will notice it’s a known malicious file with a macro.
Conclusion
Hopefully, this post helps you better analyse both .MSG and .EML email files and pull apart the contents of these files safely on an Ubuntu system without having to open them in an email client.
The key takeaways from this post are:
- Don’t use an email client to view malicious email files
- Use msgconvert to convert a .MSG email file to an .EML file.
- View .EML files in an ASCII/text viewer — VIM, Nano, GEdit, etc.
- Extract Header information and Body information
- Extract any attachments — usually in base64 encoded blobs
- Decode the attachments
- Analyse the attachments
Malware analysis of the attachments is a little beyond the scope of this blog post, however, I wanted to ensure that Incident Responders are better equipt to extract information from malicious emails using a safer method than Microsoft Outlook or another email client to view malicious files.
I’ve provided two other links to .MSG files that contain malicious attachments in the References section, if you want to practice the process I’ve provided in this post.
Happy hunting for malicious emails.
References
- https://superuser.com/questions/99250/opening-a-msg-file-in-ubuntu
- SMTP — The Multipart Content-Type RFC
- .MSG Email sample used for this blog post (SHA1: 76711be7cdc85a00c4a34ad34d62715f238da23ef06de7f62570329655c137b9)
VirusTotal Additional Practic Samples